Apr 26, 2012

Hot List

So just a little about myself.... My brain works like this: obsessed or not interested. I guess that is the issue with most of us creative folk :) Anyway, the reason I bring that up, is because it seems like every week I start obsessing over something new, thought I would put my crazy brain to work and do a little feature here on the blog called "The Hot List". These are the things I am currently obsessing over :) 

What are you obsessing over right now? Id love to know!


1) Retro Cat Eye Sungasses
2) Pastel colored hair- I love bold, and unique hairstyles!
3) Isabel Marant High Tops- Digging the 80's vibe
4) High Wasted Denim Shorts
5) Spiked Collared shirts 
6) Dip Dyed hair- heres an easy tutorial from thebeautydepartment.com
7) Studded loafers- Learn to make your own here!
8) Southwestern Prints in Neon 
9) Southwestern print wedges- sexy with a hipster vibe.


Apr 19, 2012

DIY Jewelry Ideas

I love jewelry, especially jewelry that is quirky and unique. Here is my problem though, I hate spending money on jewelry because I am such a klutz I usually lose it or break it. I also love to create, so I thought why not make my own jewelry? Ill post some of my creations later, but for now, here are some fun ideas i found across the web to get you inspired!

DIY Dreamcatcher bracelet via rentherunway. Visit the tutorial here


Wire wrapped love bracelet via The Lovely Dept. Visit the tutorial here

DIY Colorblock Leather Bracelets via elcuadernodeideas..visit tutorial here (FYI: Its in spanish, but there are step by step pics so you can still figure it out)


DIY Web Earrings via Lemon Jitters. Visit tutorial here


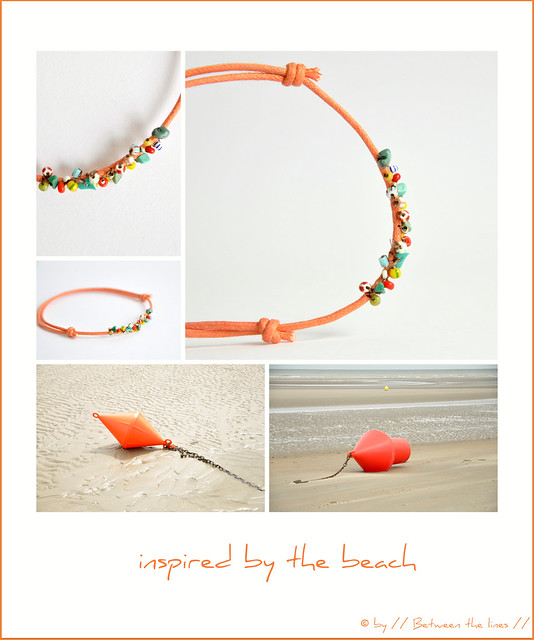
Beach Inspired bracelet via Between The Lines...Visit tutorial here


DIY Pendants via Stay At Home Artist ... view tutorial here


YOLO

I have been hearing this saying non stop on twitter and thought it was some stupid rap line...Once i found out the meaning I loved it, "You Only Live Once". Thats my life motto! I had to make a design to hang in my room :)


Design by Kristen Thompson 2012

Doodlers Anonymous

I happened across this adorable blog filled with various cute little doodles...Its been a hot minute since I have picked up a pen and drew, but after seeing this blog, I am totally inspired to break out my sketch pad and my sharpies!

Here are some of my favorites, check out the site here

Doodle by: Stephanie Kubo

By Briana Rea

By: Muxxi

Alvarez Ortega Bianchi

By Angela Fox


Welcoming Fall With Photography :)

Fall is definetly my FAVORITE season. I love the cooler air, the leaves changing, apple cider, Halloween and more. However, what I love the most about it, is the beautiful fall photography. I have just listed my fall collection up on etsy, and I hope you enjoy it!

REMEMBER: Only one more week left of FREE SHIPPING ON ALL PURCHASES! Enter the code
GRANDOPENING at checkout :)


New Series: Photography Tips & Tutorials : Getting Started

Recently, I have been posting a lot of fun pictures on my facebook page that I have taken of my son. A lot of my friends are mommies, and they are always asking, "How did you get those beautiful pictures? Did you hire a professional?" I decided that this would be a great topic to discuss on my blog.

I am self taught, and am no expert by any means. I have done extensive research, had years of practice, and had the opportunity to pick the brains of some very talented photographers. This is how I got where I am, and Id like to pay it forward by teaching you all how to take better, more professional looking pictures.

Getting Started: Equipment

1. If you are serious about photography, and have the money, I definetely reccomend purchasing a DSLR camera. I personally have had great experience with Canons. I currently use a Canon Rebel x2i. Obviously by using a DSLR, you are going to get clearer, more crisp photo's, with the option of printing them at humungous sizes. If you dont have the money to get a DSLR, dont fear...A point and shoot still has the capabiltiy of taking beautiful photos with the added help of a little post processing (Ill discuss that a little later)

2. A Flash
If you have a DSLR, I personally recomend purchasing an external flash. This is a device that attaches to your camera, and is an alternative to the built in flash that I find to be a little harsh sometimes. If you are working with a point and shoot, your built in flash is your only option, and you can work with it. Also, if you have a point and shoot, there is a great tutorial on how to create a DIY flash diffuser. Diffusers help eliminate harsh light and shadows and can help leave your photos looking more natural. A diffuser is a great purchase for any camera, but again, you can still achieve beautiful pictures without one.


3. A Tripod
Tripods are a must have if you are interested in taking your own family portraits, shooting night photography, and more. 
DSLR: By personal experience, spend the money on a nice tripod... Its worth it. I once purchased a cheap version on amazon, thinking, its still a tripod. I soon learned that it was a total waste of money. Not only was it near impossible to adjust height, it was extremely flimsy and barely held my camera wihtout toppling over. Luckily, my wonderful father purchased me a really nice tripod for Christmas, and what a difference! You want to be able to place your camera on your tripod, and move it around in different angles without it falling over. Also, being able to easily manipulate the height is a big help ecspecially when shooting family portraits. 


Point and Shoot: Guess what? They make these adorable little mini-tripods for point and shoot camera's! They are great, and actually can be purchased at places like Walmart and Target. They are called 

Read more: http://www.digital-photography-school.com/using-flash-diffusers-and-reflectors#ixzz1Za6UwEIy
Check out that tutorial by "Instructables" here

Taking Better Pictures: White Balance, It Matters :)

I am going to be brutally honest with you... For the longest time I never paid any attention to White Balance. It was something I thought didn't matter too much when it came to my pictures. I was wrong. Once I took the time to learn and read about white balance, and then put that knowledge to use, my pictures started improving a lot. White balance is part of the whole picture (no pun intended) when it comes to photography, mastering it along with all the other elements is essential in taking good pictures.

So...What is white balance?

"White balance (WB) is the process of removing unrealistic color casts, so that objects which appear white in person are rendered white in your photo." - Cambridge In Color


In your DSLR, you will find 7 different white balance settings. Each one has a specific purpose in adding proper color to your photos.


Auto : This is the setting that allows your camera to choose your white balance for you. Although the simple choice, it is not always the right choice. I will explain this in more detail later.


Tungsten: This setting is most suitable for shooting indoors. I actually use this setting when I photograph Christmas lights inside my home. It tends to cool down your photo's and makes lights look really nice in your photography.


Flourescent: Indoor lighting is usually fluorescent and gives off a cool tone to your photos. When used, this setting will add some warmth back into your photos when photographing indoors.


Daylight / Sunny: Most basic form of white balance, used best when shooting outside in sunlight. Adds a bit more cool tones, but not by a lot.


Cloudy: Similar to daylight, but will add more warmth back into your photos. Great for cloudy days that tend to give off more cool tones.


Flash: I recently learned to use this setting whenever using a flash as it adds in warmth that a flash can take away from a photo. Flashes give cool lighting, to eliminate, use this setting for a good balance of warm and cool tones.


Shade: Again, with no sunlight, your photo will tend to have cooler tones. This setting will add warmth back into the shaded photo.


As you can see, all of the above settings will add a certain amount of coolness or warmth into your photos. Knowing what kind of tones your light gives off, you will need to counteract by changing your white balance setting so that you are having even tones in your photographs.


Using A White Balance Grey Card


A great technique you can use post processing to ensure your white balance is 100% accuracy, would be to use a grey card. You can purchase one online for a cheap price, or even use a piece of grey scrap booking paper (just make sure its not reflective or shiny). 


What you do, is take a test shot of your subject while holding a grey card in the photo. Repeat this each time your subject, scenery, or lighting changes.


Bring the photo with your grey card up in your post processing program. (This will work with professional processing programs such as adobe lightroom, photoshop, raw etc. It will also work with any processing program that has a white balance tool.) 


Click on your white balance tool, and then click on the grey card in your photo. This will automatically adjust your white balance settings so they are accurate for each photo.


This is a great method because you dont need to worry about adjusting your white balance settings on your camera each time your lighting situation changes. Just take a new test shot with the grey card in the 
photo, and adjust later during your post processing. 


Any questions? Feel free to email me, and I would be happy to help!


Make sure to check out these great articles for more help as well :)


Digital Photography School: Get Your White Balance Right In Seconds Using A Grey Card.

Cambridge In Color: Understanding White Balance

Digital Photography School: Introduction To White Balance


LinkWithin

Related Posts Plugin for WordPress, Blogger...